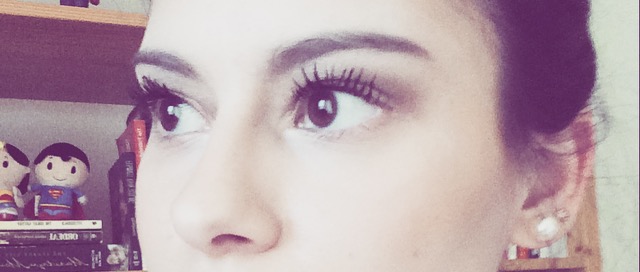
Because I want you guys to look and feel fabulous and fierce, I want to share one of my favorite beauty products with you: The Younique 3D Fiber Lashes ($29).
**** I had to add my mom’s link (she’s a presenter). She is the one who showed me the lashes ****
You can view my video below for the simple step-by-step process of how to apply the product! (the process is also listed below the blog post)
My mom introduced me to this beauty product, and by introduce, I really mean bought me the fiber lashes. How could I say no to that? At first, I was really skeptical. I didn’t like the idea of putting fibers on my lashes. I already hated putting on the fake eyelashes. I don’t like glue being on my eyes. And, even though it’s a steal (they’re like $4 at drugstores), it becomes a splurge (for me) since I always mess up. So I already had a distaste for eyelash beauty products. It’s not like I can afford getting eyelash extensions, either. So really good mascara has been my best friend…. up until now.

I listened to my mom, and tried the fiber lashes. Guess what?? I LOVE IT!!! I love that the fiber lashes are easy to apply. It’s as simple as putting on mascara. Easy, breezy. The fiber lashes last longer than two months, too! I’m going on three months since first using mine and I’m not running out any time soon.
Simple Step-By-Step Process: Younique 3D Fiber Lashes
Step 1:
- Apply any brand of regular mascara
- In my video I used Maybelline’s Volum’ Express Falsies Flared ($5.99 Drugstores)
- Before applying the Younique Fiber Lashes, let the mascara completely dry. It creates a foundation and something for the gel and the fibers to cling onto.
Step 2:
- Apply the Gel
- I like to work with one eye at a time because you don’t want the gel to dry before applying the fibers. Remember the fibers need to stick to the gel. If the gel is already dry the fibers won’t have anything to stick to and your under-eyes will look really bad.
Step 3:
- Apply the Fibers
- I like to make sure the fiber brush isn’t thick with the fibers. Dust the fly away fibers inside the tube.
Step 4:
- Apply the Gel
- Immediately after applying the fibers, apply the gel again. Make sure that you seal the fibers. You don’t want any fibers falling all over your face throughout the day.
*You can apply as many coats as desired. I like to apply 1 coat during the day, and 2 coats if I’m going out at night.
****
I want to know if you’re using this product! Share photos and add your comments about the lashes below!

Leave a comment